I can’t remember exactly the joke I was making at the time in my work’s slack instance (I’m sure it wasn’t particularly funny, though; and not even worth re-reading the thread to work out), but it wound up with me writing a UEFI binary for the punchline. Not to spoil the ending but it worked - no pesky kernel, no messing around with “userland”. I guess the only part of this you really need to know for the setup here is that it was a Severance joke, which is some fantastic TV. If you haven’t seen it, this post will seem perhaps weirder than it actually is. I promise I haven’t joined any new cults. For those who have seen it, the payoff to my joke is that I wanted my machine to boot directly to an image of Kier Eagan.
As for how to do it – I figured I’d give the uefi crate a shot, and see how it is to use, since this is a low stakes way of trying it out. In general, this isn’t the sort of thing I’d usually post about – except this wound up being easier and way cleaner than I thought it would be. That alone is worth sharing, in the hopes someome comes across this in the future and feels like they, too, can write something fun targeting the UEFI.
First thing’s first – gotta create a rust project (I’ll leave that part to you
depending on your life choices), and to add the uefi crate to your
Cargo.toml. You can either use cargo add or add a line like this by hand:
uefi = { version = "0.33", features = ["panic_handler", "alloc", "global_allocator"] }
We also need to teach cargo about how to go about building for the UEFI target,
so we need to create a rust-toolchain.toml with one (or both) of the UEFI
targets we’re interested in:
[toolchain]
targets = ["aarch64-unknown-uefi", "x86_64-unknown-uefi"]
Unfortunately, I wasn’t able to use the
image crate,
since it won’t build against the uefi target. This looks like it’s
because rustc had no way to compile the required floating point operations
within the image crate without hardware floating point instructions
specifically. Rust tends to punt a lot of that to libm usually, so this isnt
entirely shocking given we’re nostd for a non-hardfloat target.
So-called “softening” requires a software floating point implementation that
the compiler can use to “polyfill” (feels weird to use the term polyfill here,
but I guess it’s spiritually right?) the lack of hardware floating point
operations, which rust hasn’t implemented for this target yet. As a result, I
changed tactics, and figured I’d use ImageMagick to pre-compute the pixels
from a jpg, rather than doing it at runtime. A bit of a bummer, since I need
to do more out of band pre-processing and hardcoding, and updating the image
kinda sucks as a result – but it’s entirely manageable.
$ convert -resize 1280x900 kier.jpg kier.full.jpg
$ convert -depth 8 kier.full.jpg rgba:kier.bin
This will take our input file (kier.jpg), resize it to get as close to the
desired resolution as possible while maintaining aspect ration, then convert it
from a jpg to a flat array of 4 byte RGBA pixels. Critically, it’s also
important to remember that the size of the kier.full.jpg file may not actually
be the requested size – it will not change the aspect ratio, so be sure to
make a careful note of the resulting size of the kier.full.jpg file.
Last step with the image is to compile it into our Rust bianary, since we don’t want to struggle with trying to read this off disk, which is thankfully real easy to do.
const KIER: &[u8] = include_bytes!("../kier.bin");
const KIER_WIDTH: usize = 1280;
const KIER_HEIGHT: usize = 641;
const KIER_PIXEL_SIZE: usize = 4;
Remember to use the width and height from the final kier.full.jpg file as the
values for KIER_WIDTH and KIER_HEIGHT. KIER_PIXEL_SIZE is 4, since we
have 4 byte wide values for each pixel as a result of our conversion step into
RGBA. We’ll only use RGB, and if we ever drop the alpha channel, we can drop
that down to 3. I don’t entirely know why I kept alpha around, but I figured it
was fine. My kier.full.jpg image winds up shorter than the requested height
(which is also qemu’s default resolution for me) – which means we’ll get a
semi-annoying black band under the image when we go to run it – but it’ll
work.
Anyway, now that we have our image as bytes, we can get down to work, and write the rest of the code to handle moving bytes around from in-memory as a flat block if pixels, and request that they be displayed using the UEFI GOP. We’ll just need to hack up a container for the image pixels and teach it how to blit to the display.
/// RGB Image to move around. This isn't the same as an
/// `image::RgbImage`, but we can associate the size of
/// the image along with the flat buffer of pixels.
struct RgbImage {
    /// Size of the image as a tuple, as the
    /// (width, height)
    size: (usize, usize),

    /// raw pixels we'll send to the display.
    inner: Vec<BltPixel>,
}

impl RgbImage {
    /// Create a new `RgbImage`.
    fn new(width: usize, height: usize) -> Self {
        RgbImage {
            size: (width, height),
            inner: vec![BltPixel::new(0, 0, 0); width * height],
        }
    }

    /// Take our pixels and request that the UEFI GOP
    /// display them for us.
    fn write(&self, gop: &mut GraphicsOutput) -> Result {
        gop.blt(BltOp::BufferToVideo {
            buffer: &self.inner,
            src: BltRegion::Full,
            dest: (0, 0),
            dims: self.size,
        })
    }
}

impl Index<(usize, usize)> for RgbImage {
    type Output = BltPixel;
    fn index(&self, idx: (usize, usize)) -> &BltPixel {
        let (x, y) = idx;
        &self.inner[y * self.size.0 + x]
    }
}

impl IndexMut<(usize, usize)> for RgbImage {
    fn index_mut(&mut self, idx: (usize, usize)) -> &mut BltPixel {
        let (x, y) = idx;
        &mut self.inner[y * self.size.0 + x]
    }
}
We also need to do some basic setup to get a handle to the UEFI
GOP via the UEFI crate (using
uefi::boot::get_handle_for_protocol
and
uefi::boot::open_protocol_exclusive
for the GraphicsOutput
protocol), so that we have the object we need to pass to RgbImage in order
for it to write the pixels to the display. The only trick here is that the
display on the booted system can really be any resolution – so we need to do
some capping to ensure that we don’t write more pixels than the display can
handle. Writing fewer than the display’s maximum seems fine, though.
fn praise() -> Result {
    let gop_handle = boot::get_handle_for_protocol::<GraphicsOutput>()?;
    let mut gop = boot::open_protocol_exclusive::<GraphicsOutput>(gop_handle)?;

    // Get the (width, height) that is the minimum of
    // our image and the display we're using.
    let (width, height) = gop.current_mode_info().resolution();
    let (width, height) = (width.min(KIER_WIDTH), height.min(KIER_HEIGHT));

    let mut buffer = RgbImage::new(width, height);
    for y in 0..height {
        for x in 0..width {
            let idx_r = ((y * KIER_WIDTH) + x) * KIER_PIXEL_SIZE;
            let pixel = &mut buffer[(x, y)];
            pixel.red = KIER[idx_r];
            pixel.green = KIER[idx_r + 1];
            pixel.blue = KIER[idx_r + 2];
        }
    }
    buffer.write(&mut gop)?;
    Ok(())
}
Not so bad! A bit tedious – we could solve some of this by turning
KIER into an RgbImage at compile-time using some clever Cow and
const tricks and implement blitting a sub-image of the image – but this
will do for now. This is a joke, after all, let’s not go nuts. All that’s
left with our code is for us to write our main function and try and boot
the thing!
#[entry]
fn main() -> Status {
    uefi::helpers::init().unwrap();
    praise().unwrap();
    boot::stall(100_000_000);
    Status::SUCCESS
}
If you’re following along at home and so interested, the final source is over at
gist.github.com.
We can go ahead and build it using cargo (as is our tradition) by targeting
the UEFI platform.
$ cargo build --release --target x86_64-unknown-uefi
Testing the UEFI Blob
While I can definitely get my machine to boot these blobs to test, I figured
I’d save myself some time by using QEMU to test without a full boot.
If you’ve not done this sort of thing before, we’ll need two packages,
qemu and ovmf. It’s a bit different than most invocations of qemu you
may see out there – so I figured it’d be worth writing this down, too.
$ doas apt install qemu-system-x86 ovmf
qemu has a nice feature where it’ll create us an EFI partition as a drive and
attach it to the VM off a local directory – so let’s construct an EFI
partition file structure, and drop our binary into the conventional location.
If you haven’t done this before, and are only interested in running this in a
VM, don’t worry too much about it, a lot of it is convention and this layout
should work for you.
$ mkdir -p esp/efi/boot
$ cp target/x86_64-unknown-uefi/release/*.efi \
    esp/efi/boot/bootx64.efi
With all this in place, we can kick off qemu, booting it in UEFI mode using
the ovmf firmware, attaching our EFI partition directory as a drive to
our VM to boot off of.
$ qemu-system-x86_64 \
    -enable-kvm \
    -m 2048 \
    -smbios type=0,uefi=on \
    -bios /usr/share/ovmf/OVMF.fd \
    -drive format=raw,file=fat:rw:esp
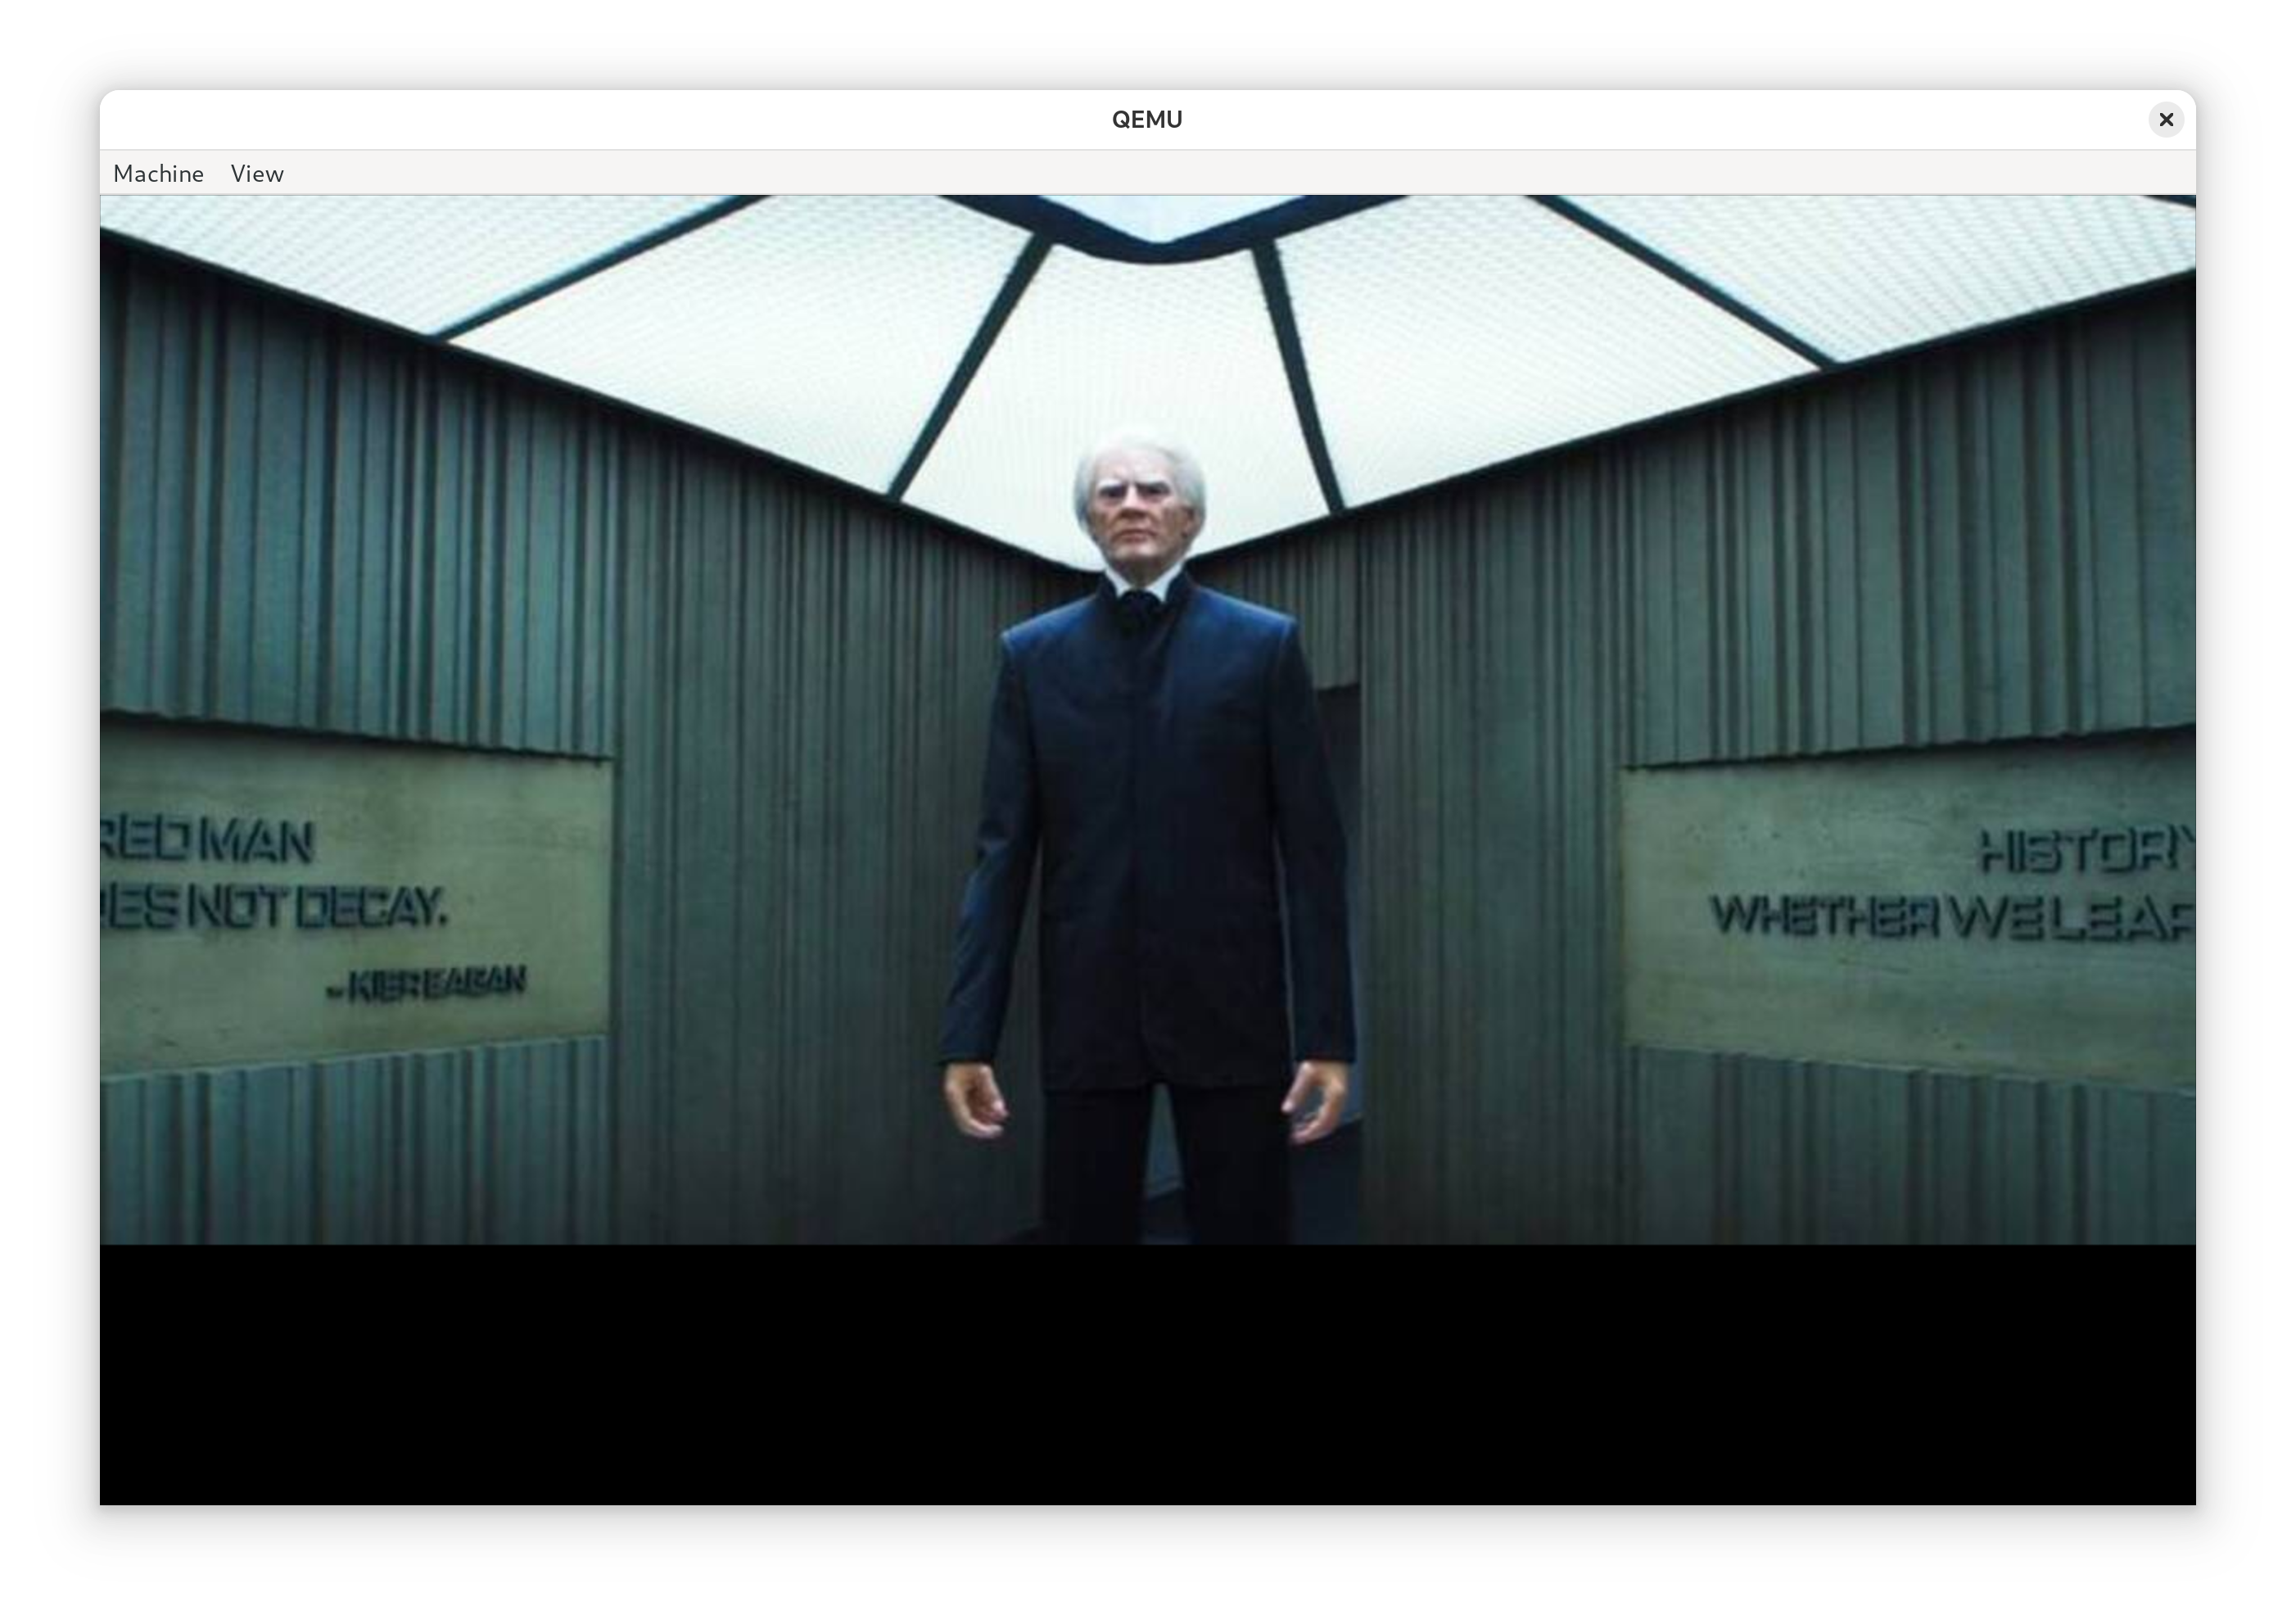
If all goes well, soon you’ll be met with the all knowing gaze of
Chosen One, Kier Eagan. The thing that really impressed me about all
this is this program worked first try – it all went so boringly
normal. Truly, kudos to the uefi crate maintainers, it’s incredibly
well done.
Booting a live system
Sure, we could stop here, but anyone can open up an app window and see a picture of Kier Eagan, so I knew I needed to finish the job and boot a real machine up with this. In order to do that, we need to format a USB stick. BE SURE /dev/sda IS CORRECT IF YOU’RE COPY AND PASTING. All my drives are NVMe, so BE CAREFUL – if you use SATA, it may very well be your hard drive! Please do not destroy your computer over this.
$ doas fdisk /dev/sda

Welcome to fdisk (util-linux 2.40.4).
Changes will remain in memory only, until you decide to write them.
Be careful before using the write command.


Command (m for help): n
Partition type
   p   primary (0 primary, 0 extended, 4 free)
   e   extended (container for logical partitions)
Select (default p): p
Partition number (1-4, default 1):
First sector (2048-4014079, default 2048):
Last sector, +/-sectors or +/-size{K,M,G,T,P} (2048-4014079, default 4014079):

Created a new partition 1 of type 'Linux' and of size 1.9 GiB.

Command (m for help): t
Selected partition 1
Hex code or alias (type L to list all): ef
Changed type of partition 'Linux' to 'EFI (FAT-12/16/32)'.

Command (m for help): w
The partition table has been altered.
Calling ioctl() to re-read partition table.
Syncing disks.
Once that looks good (depending on your flavor of udev you may or
may not need to unplug and replug your USB stick), we can go ahead
and format our new EFI partition (BE CAREFUL THAT /dev/sda IS YOUR
USB STICK) and write our EFI directory to it.
$ doas mkfs.fat /dev/sda1
$ doas mount /dev/sda1 /mnt
$ cp -r esp/efi /mnt
$ find /mnt
/mnt
/mnt/efi
/mnt/efi/boot
/mnt/efi/boot/bootx64.efi
Of course, naturally, devotion to Kier shouldn’t mean backdooring your system.
Disabling Secure Boot runs counter to the Core Principals, such as Probity, and
not doing this would surely run counter to Verve, Wit and Vision. This bit does
require that you’ve taken the step to enroll a
MOK and know how
to use it, right about now is when we can use sbsign to sign our UEFI binary
we want to boot from to continue enforcing Secure Boot. The details for how
this command should be run specifically is likely something you’ll need to work
out depending on how you’ve decided to manage your MOK.
$ doas sbsign \
  --cert /path/to/mok.crt \
  --key  /path/to/mok.key \
  target/x86_64-unknown-uefi/release/*.efi \
  --output esp/efi/boot/bootx64.efi
I figured I’d leave a signed copy of boot2kier at
/boot/efi/EFI/BOOT/KIER.efi on my Dell XPS 13, with Secure Boot enabled
and enforcing, just took a matter of going into my BIOS to add the right
boot option, which was no sweat. I’m sure there is a way to do it using
efibootmgr, but I wasn’t smart enough to do that quickly. I let ‘er rip,
and it booted up and worked great!
It was a bit hard to get a video of my laptop, though – but lucky for me, I have a Minisforum Z83-F sitting around (which, until a few weeks ago was running the annual http server to control my christmas tree ) – so I grabbed it out of the christmas bin, wired it up to a video capture card I have sitting around, and figured I’d grab a video of me booting a physical device off the boot2kier USB stick.
Attentive readers will notice the image of Kier is smaller then the qemu booted system – which just means our real machine has a larger GOP display resolution than qemu, which makes sense! We could write some fancy resize code (sounds annoying), center the image (can’t be assed but should be the easy way out here) or resize the original image (pretty hardware specific workaround). Additionally, you can make out the image being written to the display before us (the Minisforum logo) behind Kier, which is really cool stuff. If we were real fancy we could write blank pixels to the display before blitting Kier, but, again, I don’t think I care to do that much work.
But now I must away
If I wanted to keep this joke going, I’d likely try and find a copy of the original video when Helly 100%s her file and boot into that – or maybe play a terrible midi PC speaker rendition of Kier, Chosen One, Kier after rendering the image. I, unfortunately, don’t have any friends involved with production (yet?), so I reckon all that’s out for now. I’ll likely stop playing with this – the joke was done and I’m only writing this post because of how great everything was along the way.
All in all, this reminds me so much of building a homebrew kernel to boot a
system into – but like, good, though, and it’s a nice reminder of both how
fun this stuff can be, and how far we’ve come. UEFI protocols are light-years
better than how we did it in the dark ages, and the tooling for this is SO
much more mature. Booting a custom UEFI binary is miles ahead of trying to
boot your own kernel, and I can’t believe how good the uefi crate is
specifically.
Praise Kier! Kudos, to everyone involved in making this so delightful ❤️.